
Back in January, I shared my process for creating the biographical profile box (what I call a Genealogy Snapshot box) that I attach to each blog post about a particular ancestor or relative on my family history blog. I provided instructions for both a self-hosted WordPress.org site, as well as less customizable hosted WordPress.com or Blogger sites. If you haven’t read those posts yet, I recommend you do so before proceeding further with this second part. Those posts explain why I use a Snapshot and show a few different use cases.
Please keep in mind that this Part II will ONLY work on self-hosted WordPress.org-run sites.
Reusable Content
Unlike the Hike-At-A-Glance (HAG) box example that I showed in my original post, which I code into my hiking and outdoors blog, the content in my Snapshot Boxes gets used over and over. No two hiking trails have the exact same details, so the HAG boxes each contain unique content. While I might share new or updated details about an ancestor in each blog post about that ancestor, I want to display the same basic biographical details about that ancestor in each one of those posts. If you are a database schema nerd like me, this means:
- Each HAG box contains the same fields, but the values vary in every single post.
- Each Snapshot box contains the same fields, but the values for each ancestor remain the same in every post. The values only vary for each ancestor.
For both the HAG box and the Snapshot box, I try to re-key as little duplicate data as possible each time I add those highlighted boxes to a blog post, saving me a ton of time and extra work. This approach also helps prevent mistakes made by re-keying the same data into each and every post. I know that a number of my blog readers enthusiastically started adding these biographical boxes to their own blog posts (many sent me links and photos!) from the HTML and CSS code blocks I provided in Part I, but based on just the instructions I provided in Part I, they have to manually add the HTML framework and content to every single post. I don’t. I add this once, and reuse it over and over again throughout my blog.

The Usual Approach
My HAG boxes are coded into my actual customized WordPress child theme, via the custom functions.php file. The visual look and feel is controlled via the custom style.css in my child theme. The content is generated through a mix of Custom Meta Fields in a post, Custom Taxonomies in the site, and custom functions that I wrote into functions.php to generate content based on conditional statements that parse through the Custom Meta Fields, Custom Taxonomies, and custom Hooks applied to each individual post.
Initially, I set out applying the same approach when I first envisioned my Genealogy Snapshot boxes, and quickly determined it was not an optimal approach. Technically, that solution would work just fine. But workflow-wise, it still created too much extra work on each post because of needing to reuse the same content over and over again in multiple blog posts.
The New Approach
My solution from the Genealogy Snapshot box was the Global Content Blocks plugin.
If you’re one of the colleagues or friends with whom I regularly discuss WordPress, you know that I try to avoid plugins as much as possible. I will always opt for a self-coded solution that I can integrate into a child theme if I can figure out how to make that happen. Too many plugins slow down your site and page load time. And if plugins are not kept up to date, your site will break, and you also expose yourself to getting hacked.
So I was torn on this one. But the benefits outweigh the risks. At least for now. I highlight those benefits towards the bottom of this post.
Global Content Blocks
The specifics on how to use the plugin and integrate it into your blog posts or pages.
Installing the Plugin
Download the plugin for the WordPress Plugin Directory. Install and activate as usual. But, as you should already do with every plugin, make sure you backup your WordPress database and files prior to installation. If you utilize caching plugins, make sure you clear that cache after activating the plugin.
Accessing the Plugin
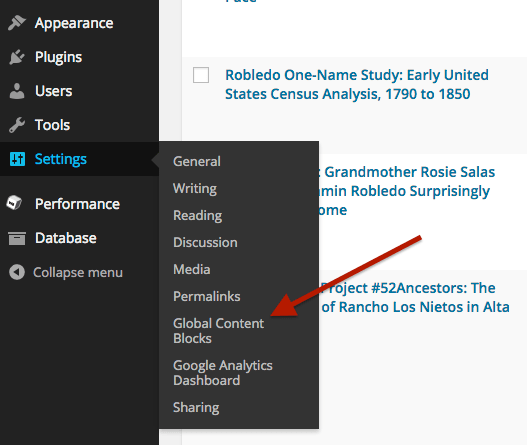
Once activated, you will access the Global Content Blocks plugin settings from the main Settings menu of your WordPress dashboard [Figure 3].
Using the Plugin
From the Global Content Blocks settings, you can create a new content block or access your existing library of content blocks if you need to modify and update one.
Creating & Editing Blocks
The red arrow in Figure 4 shows you the “Add a New Content Block” button to click to create a new Snapshot block. This brings up a form with a WYSIWYG editor as show in Figure 6 (the Edit Content Block screen). However, I always work in the Text view of the WYSIWYG [Figure 7], mainly because I am usually copying and pasting the raw HTML code (again, refer back to Part I for the code) from an external file. Then click on the “Save” button at the bottom of the screen to save your work [Figures 6-7].
A quick look at the form fields in the Edit Content Block screen:
- Name (Short Title): I use a standard naming convention of Surname, Given Names (year of birth – year of death) — if known. Sometimes even a brief identifying note (like the “CNCGUARD” notation in item 43 for William Pace in Figure 5) if a name is too common and belongs to many ancestors. NOTE: If I later discover a corrected name or corrected dates for a person, I can change these values since the plugin database does not use Name as the unique identifier for each content block.
- Custom Shortcode String: I leave this blank, and allow the system to generate a unique identifier shortcode. Frankly, I work with far too many names in my family history blog to attempt to create my own shortcode names and remember them.
- Type: I toggle this to the HTML option since I am working with a raw HTML code block.
- Description: I add a note, to identify the ancestor’s relationship to me or my husband.
- Content: This is the raw code block beginning with “<!– Start copying into raw HTML editor –>” and ending with “<!– End copying into raw HTML editor –>”. It is the actual Snapshot content, including the heading.
Editing and updating an existing Snapshot box works the same way, except instead of clicking on the “Add a New Content Block” button, look in the block library for the item (person) you want to modify. Click on their name, and this will bring up the Edit Content Block screen. You don’t make any actual changes on your blog post(s); all changes are made in the Global Content Block.


Word of Caution on Updating an Existing Snapshot
One big quirk in the plugin, and pet peeve of mine, is that when opening up an existing content block to modify it, the “<br />” tags in the original code block usually disappear from the HTML markup. You can see this in Figure 7. Although each line of my originally code ended in “<br />” tags, and those tags were saved when creating the block (as evidenced by displaying correctly on the actual blog post), the plugin visual editor appears to strip them out when the Edit Content Block screen is reopened.
If you don’t catch that, your Snapshot lines will all run together like a paragraph, instead of displaying nice neat separate readable lines.
So you have to manually add those “<br />” tags back in every time you modify an existing block. Which is why I save each Snapshot code block in an external text file, and simply copy and paste back and forth. My external text file always has the “<br />” tags included.
Adding Blocks to Posts
Adding Global Content Blocks to blog posts or pages is super easy!
Whether you are writing an initial blog post about an ancestor, or you have already written a bunch of blog posts about that particular ancestor, the Global Content Blocks plugin allows you quickly add the Snapshot box. I started my Snapshot boxes long after I had been blogging my family history. It only takes a few minutes to go back to those old posts and add in the new Snapshot box.
One of the beauties of using the plugin instead of manually creating the Snapshot box in every single relevant post, is that when I need to correct or add to the biographical details of an ancestor, I only need to make that change in one spot — that particular code block in my Global Content Blocks library. Modifying that global block and saving it generates the changes in every single blog post or blog page to which it is attached. So efficient!

The example above [Figure 8] shows the bottom content area of an older blog post about one of my husband’s ancestors. The post predates when I started using the Genealogy Snapshot boxes, so it doesn’t yet display one. While working on a more recent post about that same ancestor, I created his Snapshot box in a new Global Content Block, and then added it to the older post (all older posts).
From within the Edit view of the blog post to which you want to add the Snapshot box, move your cursor to where you want the box to display. Look for the Global Content Blocks button in your WYSIWYG editor [Figure 9]. It looks like three multicolored blocks stacked together.

Clicking on that Global Content Blocks button brings up a Global Content Blocks dialog box [Figure 10]. Since you already have your code block created in the Global Content Blocks library, you choose the first option, to “Insert Global Content Block”.
Note that you can actually create the new code block from this screen. I just always find it easier to create it first in the Global Content Blocks library, and insert it from this screen.

Once you click on the “Select a content block” drop-down menu, the dialog will display a list of your existing Global Content Blocks [Figure 11]. These are displayed in the order in which you created them, with the most recent at the bottom — not in alphabetical order. Click on the block you want to use. Your browser Find function can help with this.

The block name you selected should now be displayed in that “Insert Global Content Block” field [Figure 12]. If the correct name is not displayed, repeat the preceding steps.
For the Snapshot box (not necessarily for other global block use cases), you want to click on the “Insert Content Block” button. Do not check the box that says “Insert full content” [Figure 12]. Your Snapshot box will still show up if you mistakenly check that box, however, you will break the dependency, the “global” part of your Snapshot content block. Checking that box simply copies the actual raw code block, creating a one-off instance. What this means is, the code will still display and work, however… any changes you make to the original Global Content Block will not get reflected in this one-off instance. This one-off instance is orphaned.

After clicking on the “Insert Content Block” button, you are taken back to your normal blog post or page edit screen. Here you will see an icon representing the Global Content Block, rather than the actual text and markup [Figure 13].

At this point, save your blog post draft as normal, and preview it in a browser to see the Global Content block and Snapshot box in live action [Figure 14].

If you need to make corrections (or just update the data), return to the Global Content Blocks library and make those changes there. Save those changes in your Edit Content Block screen [Figures 6-7], then refresh your blog post preview in the browser to see and test those changes. I frequently have to flip back and forth a few times to fix misspellings, broken hyperlinks, modify or add names, etc.
WAY WAY easier than having to make those changes separately in each and every single blog post about an ancestor!
Revisiting Custom Functions vs. the Plugin
Now that you’ve seen how this plugin works, I can better explain some of the reasons I chose this method over my usual one of creating a custom function and hook in the functions.php file of the child theme.
- Right now I only have 43 Global Content Blocks. As I write about new ancestors, and continue to go back and add Snapshots to older blog posts, that list will grow fast. Having to remember the name of each custom shortcode — which is what I would have to do via the functions.php approach — just isn’t feasible for my brain. The plugin creates and recalls those shortcode names for me.
- Even using a functions.php approach, like I do in my hiking blog, that generates the box content via Custom Meta Fields and Custom Taxonomies would require too much repetitive manual copying and pasting. The Custom Taxonomies part would work just fine. But populating the Custom Meta Fields would force me to find the hyperlink to each person’s name, manually copy in that person’s name and hyperlink markdown. Over and over again, in each blog post. That’s too repetitive, and leaves too much room for error. The plugin allows me to create those names and links in one spot, and reuse them everywhere. Plus I’d have to create way too many Custom Taxonomies for things like relationships (parent, child, husband, wife, etc.). No thank you. I don’t wish to recreate my genealogy database software.
- I love the convenience of the drop-down menu picker for reviewing the list of Global Content Blocks and choosing the one I want to use. This can’t be done via my custom functions.php method.
- I like that Global Content Blocks can be inserted anywhere in a particular post or page (top, middle, bottom, even multiple boxes for multiple ancestors). A custom functions.php approach does not allow me that kind of flexibility; the required hooks force the output to the same spot every time.
I realize that all of the detail I have provided on the custom functions.php approach versus this plugin approach is a lot more technical than what most of my readers care to understand. However, in the event some of you are regular WordPress coders, I wanted to provide sufficient explanation and food for thought.
What Next?
Part III of this Snapshot Box series will demonstrate how I maintain my snapshot library in external files and backup my snapshot code to keep it safe. Unlike this Part II, the processes I plan to explain in Part III do not require a plugin, and therefore can be implemented on the more limited hosted WordPress.com version or even Blogger.
Follow my professional Facebook Page , which is packed with tips, collections, events, and news personally recommended by me. I scour the web for great information for you. See you on Facebook today!
Great follow-up on your Genealogy Snapshots. I can’t use this as I have wp.com but it is interesting to read about different ways to make our writing easier.
I love this idea! I’m interested to know how (or if) you have altered your snapshot boxes now that Global Content Block plugin is no longer available.
Can you help those of us who are “code-challenged”? I would love to get this to work properly (meaning, get the formatting to show up in my posts).
Hi Jenny,
So far, I’ve been slowly migrating the society websites I manage over to the Reusable Text Blocks by Hal Gatewood. https://wordpress.org/plugins/reusable-text-blocks/
I have not yet time to switch my personal websites over to it, but this plugin looks like it meets the same need.
After I play with the new plugin a bit more, I’ll do an updated how-to post.